Keeping Your Plumbing in Tip-Top Shape!
As a homeowner in Warwick, DE, you know that plumbing is one of the most important systems in your house. Imagine turning on your sink and nothing comes out, or worse—dealing with a leaky pipe that creates a mini waterfall in your kitchen! Yikes! But don’t worry, we’ve got your back. Keeping your plumbing in good shape doesn’t have to be a hassle. With a little bit of effort and some easy DIY fixes, you can tackle common plumbing problems like a pro!
Why Take Action?
Maintaining a healthy plumbing system is essential for your home to function smoothly. The last thing you want is for a small issue to snowball into a major headache. That’s why being proactive and learning how to handle simple fixes can be a game-changer. Not only will it save you time, but it will also give you the confidence to handle emergencies when they pop up!
This guide is packed with easy and effective DIY tips that will empower you to address those pesky plumbing dilemmas before they become big problems. So grab your tools, roll up your sleeves, and let’s dive into the world of home plumbing fixes!
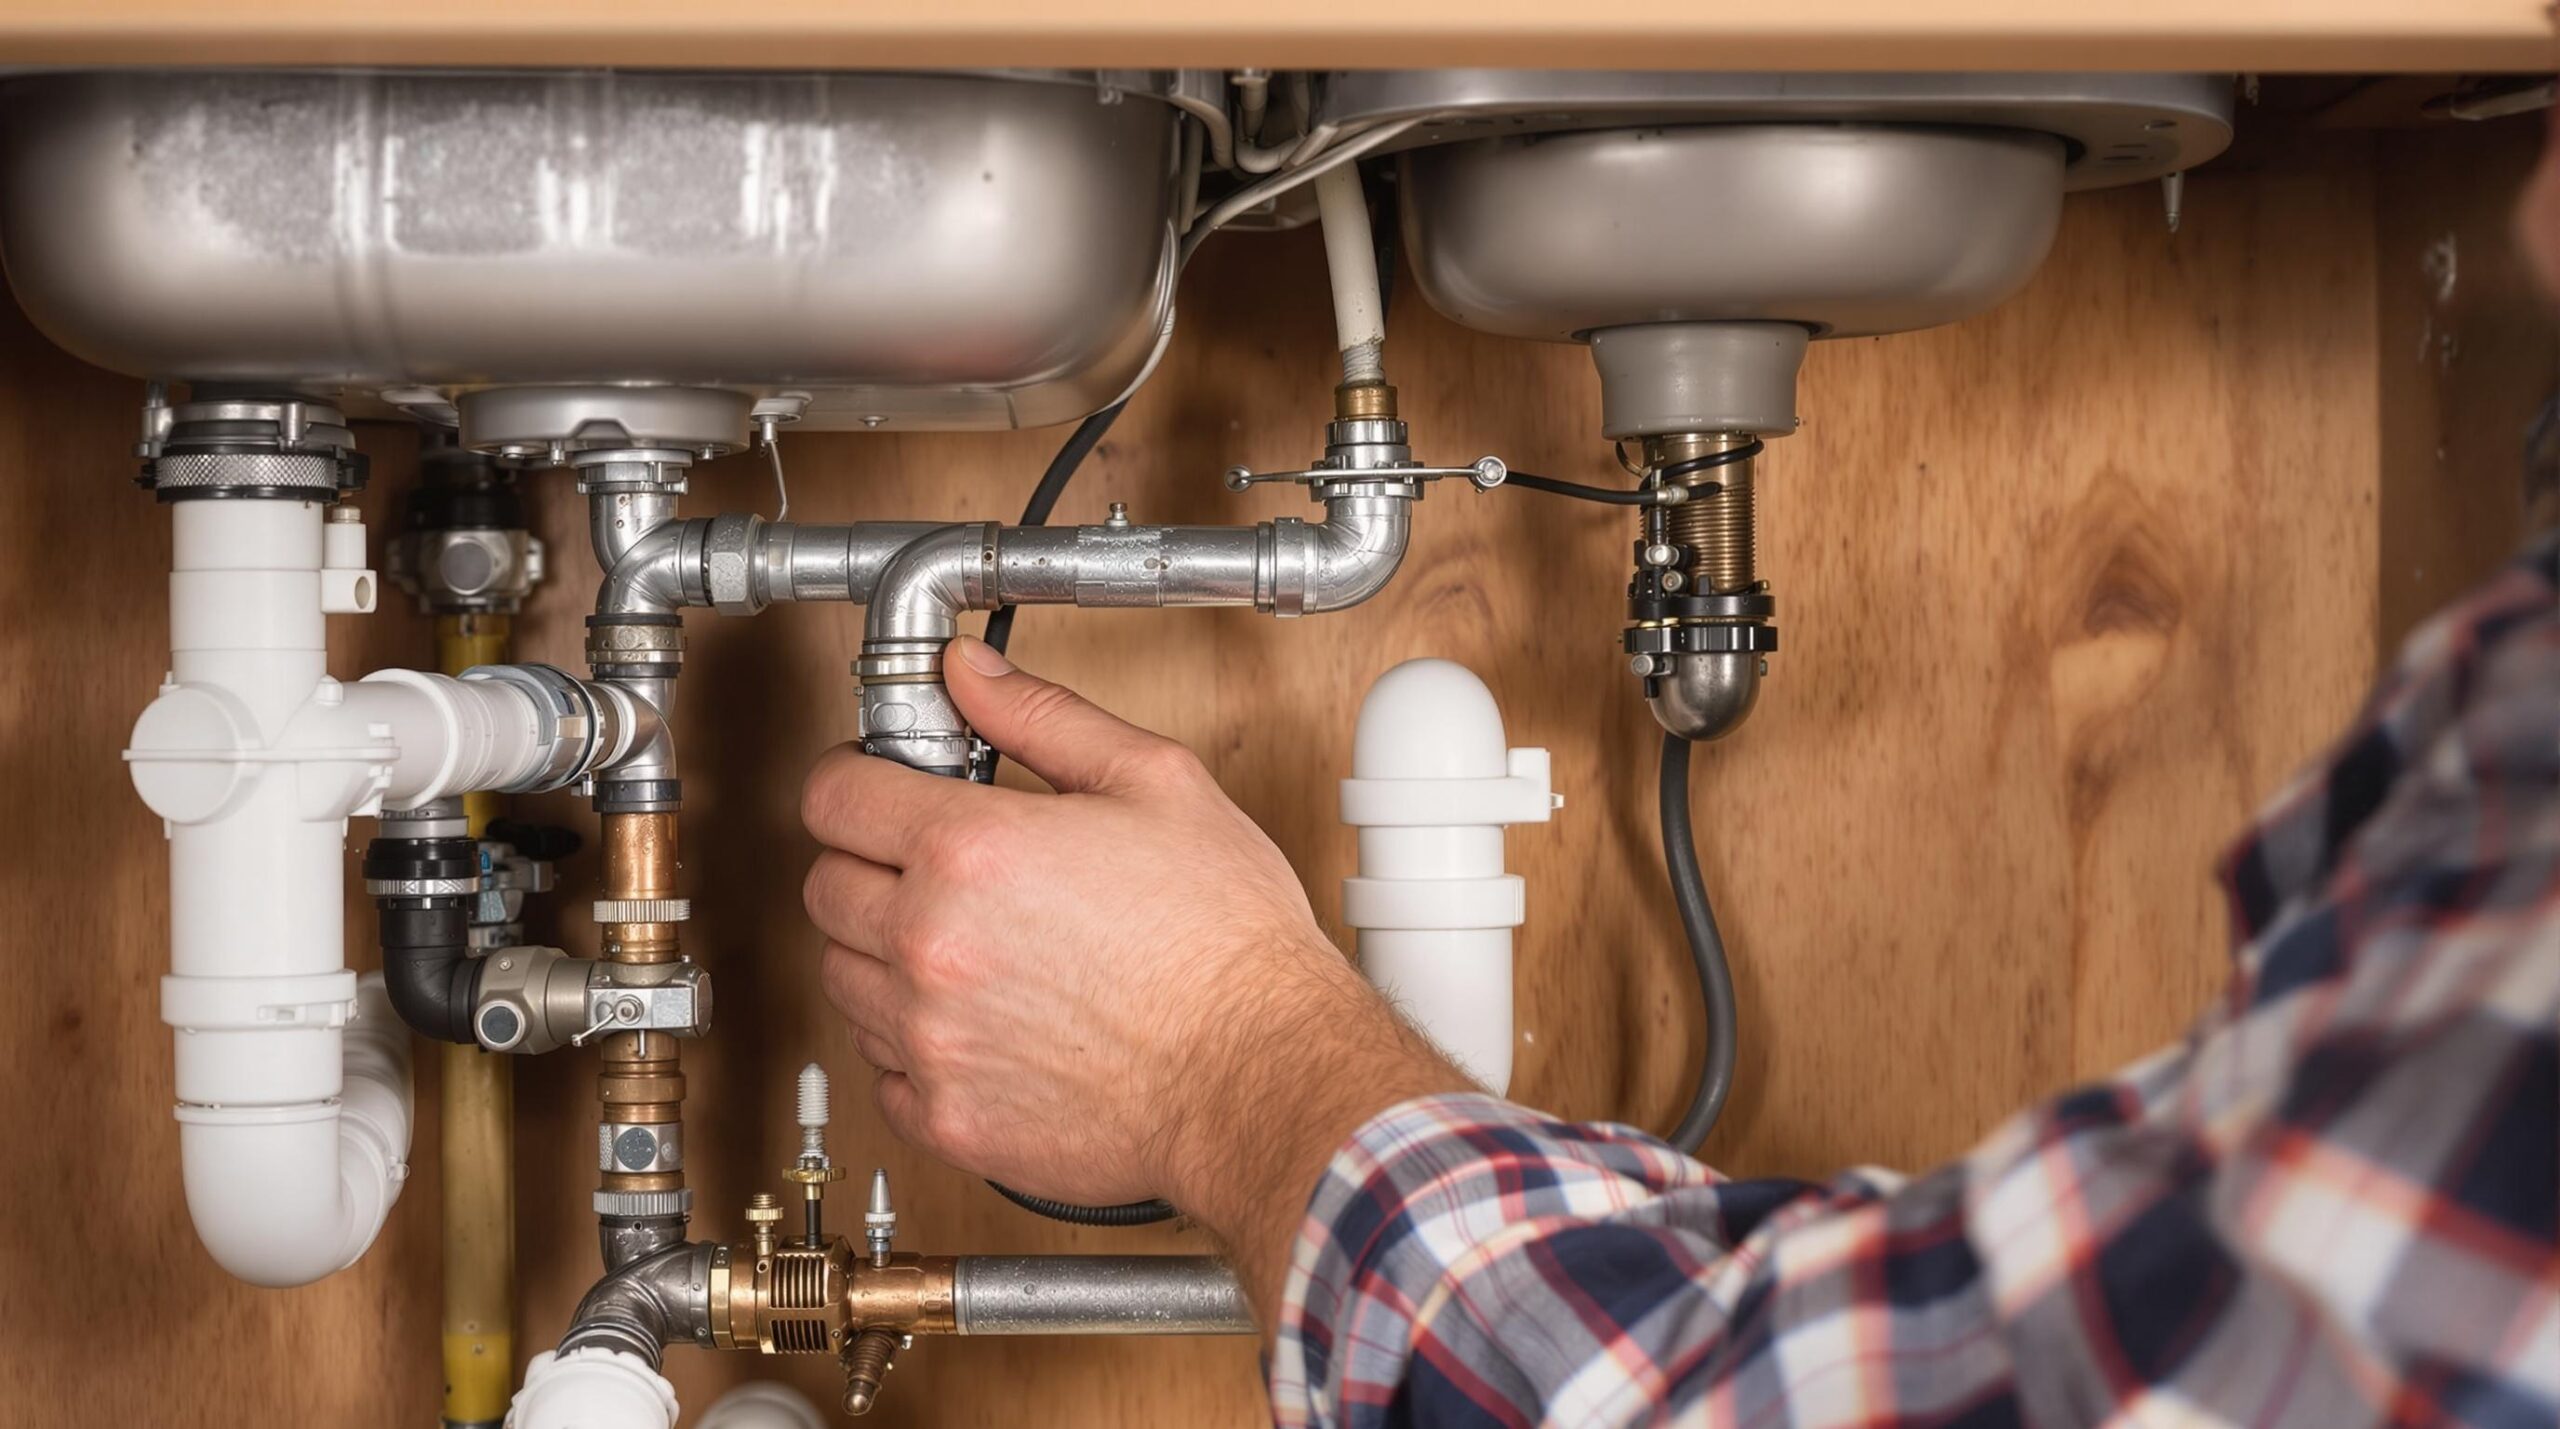
Assess and Maintain Your Pipes
To truly master the art of plumbing maintenance, it’s vital to develop a routine that includes regular inspections of your pipes. Think of it as an essential ritual for your home. Just like you wouldn’t ignore the health of your body, your plumbing system deserves the same level of attention and care. By familiarizing yourself with the hallmarks of a healthy pipe, you’ll be better equipped to spot any early signs of wear and tear that could spell trouble down the line.
What to Look Out For
Monitoring your plumbing doesn’t have to be a daunting task. You don’t need to be a professional plumber to identify issues; a simple awareness of what to look for can go a long way. Below are key indicators that may help you detect early problems:
| Sign | Description | Action |
|---|---|---|
| Discoloration | Any rust or brown hues on your pipes may indicate corrosion. | Consider replacing affected pipes and consult a plumbing professional. |
| Leaks | Even small drips can lead to significant issues over time. | Identify the source and seal leaks promptly with appropriate tape or materials. |
| Unusual Noises | Sounds such as banging, whooshing, or gurgling can signal air in pipes or improper drainage. | Try to locate the source and assess whether the issue might require expert assistance. |
| Water Pressure Changes | A sudden drop in water pressure could point toward a blockage or leak. | Inspect your fixtures and consider flushing your pipes to remove potential clogs. |
| Foul Odors | A persistent bad smell may mean a sewer line issue or a leak. | Check for leaks and contact a plumber if the smell persists. |
Incorporating a simple checklist for these signs into your routine can save you from future headaches. Remember, regular inspections not only help safeguard against unexpected plumbing failures but also serve as an excellent opportunity to familiarize yourself with the layout and condition of your home’s plumbing system.
The Importance of Prevention
Your proactive approach to assessing your pipes can also extend beyond just keeping an eye out for physical signs. It’s about creating a maintenance mindset. Schedule regular checks—perhaps every six months—and keep a maintenance journal documenting what you find and any actions taken. Not only will this practice provide you peace of mind, but it will also lay the foundation for swift action should a more significant issue arise.
So gear up, get familiar with your plumbing, and remember that awareness is power! With these simple steps and regular inspections, you can maintain a robust plumbing system that stands the test of time. In the next section, we’ll tackle one of the most common annoyances in any household: clogged drains. Get ready to discover effective DIY methods to keep those pesky blockages at bay!
Unclogging Drains Made Easy
Clogged drains can quickly transform your relaxing sanctuary into a chaotic mess. Whether it’s the sink, shower, or toilet that’s causing grief, the good news is that you don’t need to summon a professional plumber every time a blockage occurs. With just a few household items and a sprinkle of ingenuity, you can tackle stubborn clogs head-on!
Effective DIY Methods to Clear Blockages
Before running to the hardware store for commercial drain cleaners, consider these tried-and-true DIY methods that utilize common household items. Not only are they eco-friendly, but they also come with the bonus of being budget-friendly!
Baking Soda and Vinegar
This classic combo is a dynamite duo when it comes to clearing out clogs. Start by pouring a half-cup of baking soda down the drain, followed by a half-cup of white vinegar. The mixture will fizz and bubble, breaking down grime and debris. Allow it to sit for about 30 minutes, then pour hot water down the drain to flush it out. Voila! Your drain should be clearer and smelling fresh!
Salt and Hot Water
Sometimes all you need is a bit of salt to do the trick. Pouring a generous amount of salt down the drain, followed by a pot of boiling water, can create a chemical reaction that dislodges built-up gunk. Allow it to work its magic for a few minutes and repeat as necessary.
Plunger Power
For stubborn clogs, a plunger can be your best friend. Ensure you have a cup plunger, which is specifically designed for sinks and toilets. Create a strong seal, then plunge vigorously. The suction created will help to dislodge whatever is causing the blockage, ensuring a free-flowing drain.
Use a Wet/Dry Vacuum
If you’re feeling a bit more adventurous, a wet/dry vacuum can be a powerful tool for tackling stubborn clogs. If you can access the drain with the vacuum hose, set it to liquid mode and create a tight seal. Give it a few moments to suck the blockage out. Just make sure to wear gloves and consider a towel nearby—you might encounter some mess along the way!
Preventative Strategies to Keep Drains Flowing Smoothly
While these DIY methods are handy for tackling clogged drains, the best strategy is always prevention. By implementing a few simple habits in your daily routine, you can keep your drains flowing smoothly and avoid those pesky clogs altogether.
Be Mindful of What Goes Down
One of the simplest ways to prevent clogs is to be conscious of what you’re letting slide down the drain. Avoid disposing of grease, coffee grounds, hair, or food scraps in the sink. Instead, keep a compost pile for biodegradable waste, and designate a container for used oils.
Regular Maintenance
Just like your plumbing inspections, maintaining your drains should be a part of your cleaning routine. Once a month, flush your drains with hot water, or use a mixture of baking soda and vinegar to keep the pipes clear of build-up. A little regular care goes a long way in preventing major blockages.
Use Drain Screens
Adding drain screens to sinks and showers can be a game changer. These small, mesh devices catch hair, soap scum, and food particles before they make it down the drain, significantly reducing the likelihood of clogs. Remember to clean these screens regularly to prevent overflow!
With these methods and preventative strategies at your fingertips, you are now equipped to battle clogged drains like a pro! By keeping your drains flowing smoothly, you not only enhance your home’s functionality but also maintain that serene atmosphere we all crave. In the next section, let’s address another common household hassle: those annoying leaky faucets.
Fixing Leaky Faucets
Dripping faucets can seem like a minor nuisance, but over time, that incessant drip-drip-drip can lead to significant water waste. In fact, a single leaky faucet can waste gallons of water each month—water that could fill up a swimming pool! But don’t fret; fixing a leaky faucet is a straightforward DIY project that can save you both water and the hassle of a larger plumbing issue down the road. Here’s a step-by-step guide to diagnosing and repairing common faucet leaks.
Step 1: Identify the Type of Faucet
Before you dive into repairs, you need to identify what type of faucet you have. The four main types include compression, cartridge, ball, and disc faucets. Each type has its unique mechanisms and valves, so knowing which kind you’re working with is essential for the right fix. Once you’ve identified your faucet type, you’re ready to gather your tools and get to work!
Step 2: Gather Your Tools
For this task, you’ll want to have a few key tools handy:
- Adjustable wrench
- Screwdriver (flathead and Phillips)
- Replacement washers and O-rings (based on your faucet type)
- Towel or bowl to catch water
Step 3: Turn Off the Water Supply
Safety first! Make sure to turn off the water supply to the faucet before you start your repair. Usually, you’ll find the shut-off valves under the sink. Turn them clockwise to stop the water flow, and then turn on the faucet to let any residual water run out. Place your towel or bowl underneath to catch any spills as you work.
Step 4: Disassemble the Faucet
Using your screwdriver, gently remove the handle of the faucet. Depending on your faucet type, this may involve removing decorative caps to access screws. Once the handle is off, you can see the inner workings of the faucet. For compression faucets, you’ll see a cartridge or a valve; for cartridge faucets, remove the cartridge itself; and for ball and disc faucets, the mechanism will be different. Take care to remember the order and orientation of parts as you take them apart—it will make reassembly much easier!
Step 5: Inspect and Replace Worn Parts
Now that you have everything disassembled, it’s time to inspect the components. Look for worn-out washers, O-rings, or seals, as these are often the culprits behind leaks. If you notice any damage, it’s time to replace these parts. Simply remove the old washer or O-ring and replace it with a new one of the same size and material. It’s wise to take the worn part to your local hardware store to ensure you get the perfect match.
Step 6: Reassemble the Faucet
Once you’ve replaced the necessary parts, it’s time to put everything back together. Carefully reassemble the faucet in the reverse order of disassembly. Make sure everything fits snugly, but be careful not to overtighten any screws, as this could lead to further leaks or damage.
Step 7: Turn the Water Supply Back On
With the faucet reassembled, turn the water supply back on by rotating the shut-off valves counterclockwise. Slowly test your faucet by turning on the handle. Watch for any drips or leaks. If everything is working smoothly, congratulations! You’ve successfully fixed your leaky faucet.
Maintenance Tips to Prevent Future Leaks
Now that you’ve tackled that leaky faucet, keep an eye on it moving forward. Regular maintenance can prevent future leaks and keep your plumbing in tip-top shape. Perform periodic inspections of seals and washers, and consider replacing them as part of your yearly home maintenance checklist. This simple act can save you precious water and prevent the frustration of future leaks.
With the knowledge of how to fix leaky faucets under your belt, you’re now one step closer to mastering home maintenance! Next, we’ll turn our attention to another common household hurdle: dealing with toilet troubles that can disrupt your daily routine.
Toilet Troubleshooting Tips
Toilets are essential fixtures in every home, providing us with comfort and convenience. However, when they start exhibiting common problems such as continuous running or weak flushes, they can quickly turn from a helpful necessity to a perplexing annoyance. Fortunately, many toilet troubles can be solved with a little troubleshooting and DIY skills. In this section, we’ll explore some quick tips to diagnose and fix these pesky toilet issues efficiently.
Common Toilet Problems
| Problem | Symptoms | Potential Solutions |
|---|---|---|
| Continuous Running | Water runs constantly in the bowl or tank. | Check the flapper valve for wear, adjust the float arm, or replace the fill valve. |
| Weak Flush | The toilet doesn’t clear waste properly and often requires multiple flushes. | Clear any blockages in the trap, check for low water levels in the tank, or inspect the flush valve. |
| Clogs | Toilet won’t flush or drains slowly. | Use a plunger or a toilet auger to remove the obstruction. |
| Phantom Flush | The toilet appears to flush on its own. | Check for leaks from the flapper valve or inspect the float mechanism for misalignment. |
| Overflowing Toilet | The bowl fills dangerously close to the rim. | Turn off the water supply and use a plunger to clear the blockage. Inspect the fill valve and overflow tube. |
1234567890
Understanding how to troubleshoot common toilet issues can save you time and frustration. Here are steps to tackle some of the frequent problems:
How to Fix a Continuous Running Toilet
If your toilet is constantly running, the first step is to inspect the flapper valve. This rubber component controls the flow of water from the tank to the bowl. Over time, it can wear out or become misaligned, leading to continual water flow. To fix it:
- Remove the tank lid and flush the toilet to observe the flapper’s movement.
- If the flapper doesn’t seat properly, adjust or replace it.
- Check the float mechanism to ensure it’s set correctly; it should allow the tank to fill to an appropriate level.
Unclogging Your Toilet
For clogs, your trusty plunger is your best friend. Here’s how to use it effectively:
- Make sure there’s enough water in the bowl to cover the plunger.
- Position the plunger over the hole and make sure it creates a good seal.
- Push down firmly and pull up quickly to create suction. Repeat this motion several times.
If plunging doesn’t work, you may need to reach for a toilet auger to help clear the blockage.
Conclusion
With these straightforward toilet troubleshooting tips, you can tackle common issues head-on. By understanding the mechanics behind your toilet’s operation, you can not only resolve problems quickly but also prevent larger issues from developing in the future. Armed with this knowledge, you’ll be ready to manage typical toilet annoyances that arise in every household.
Now that you’ve got toilets under control, let’s move forward to another vital aspect of home maintenance: maintaining your water heater. Your water heater plays a crucial role in daily comfort, so following our guide for simple maintenance checks will help extend its lifespan and ensure you continue to enjoy hot showers and warm water without interruptions!
Essential Water Heater Maintenance
As one of the most vital appliances in your home, maintaining your water heater is crucial for both comfort and efficiency. Forgetting about it can lead to inconvenient breakdowns, unexpected cold showers, and potential water damage. By making a commitment to regular upkeep, you’ll not only extend the lifespan of your water heater but also enhance its performance. Here are some straightforward maintenance checks you can easily perform to keep your water heater running smoothly and efficiently.
Draining Sediment
Over time, sediment can accumulate at the bottom of your water heater tank, especially in areas with hard water. This buildup can lead to numerous problems, such as decreased efficiency and premature wear. Here’s how to drain the sediment:
- Turn off the water heater and let it cool down for a few hours to avoid burns.
- Locate the drain valve, typically at the base of the tank, and attach a hose to it that leads to a nearby drain or bucket.
- Open the valve to allow the sediment to flow out, allowing about 5 gallons of water to drain. You may need to repeat the process until the water runs clear.
- Close the valve, remove the hose, and refill the tank by turning the water supply back on.
Testing the Pressure Relief Valve
Your water heater is equipped with a pressure relief valve to release excess pressure or steam that can build up inside the tank. This important safety feature must be tested regularly to ensure it functions properly. Here’s how to conduct a simple test:
- Locate the pressure relief valve on the side of the tank.
- Carefully lift the valve’s lever to release a small amount of water. You should hear a hissing sound as steam or pressure escapes.
- If water flows freely and then stops when you release the lever, your valve is functioning correctly. If there’s no flow or if it continuously leaks, it’s time for a replacement.
Inspecting for Leaks and Damage
Regularly scanning your water heater for leaks or visual signs of wear is key to avoiding costly repairs. Look for:
- Water pooling around the base—the first sign of a potential leak.
- Rust or corrosion on the tank exterior; this could indicate that the unit is nearing the end of its life.
- Inspect the connections and pipes for loose fittings or signs of wear.
If you discover any issues during your inspection, address them promptly to prevent bigger problems down the line.
Final Thoughts
Adopting a proactive approach to your water heater maintenance not only ensures that you can enjoy hot water whenever you need it but also enhances your home’s overall comfort. Simple tasks such as draining sediment, testing the pressure relief valve, and conducting visual inspections can make a significant difference in the efficiency and longevity of your water heater. Begin your water heater maintenance journey today and ensure your home remains a sanctuary of warmth and comfort.
As you embrace these hands-on plumbing tips, remember that by taking care of your systems, you create a ripple effect of efficiency throughout your home. A well-maintained water heater contributes to a more comfortable living environment and reduces the likelihood of unexpected issues. Stay proactive, and your plumbing systems will reward you with seamless water access for years to come!
By adopting a proactive approach and utilizing these practical DIY plumbing tips, Warwick, DE residents can maintain efficient plumbing systems in their homes. But what are the most common plumbing problems that homeowners in this area might encounter? Knowing what to watch for can save you both time and stress.
Common Plumbing Problems in Warwick, DE Homes
From unexpected leaks to pesky clogs, Warwick homeowners often deal with several recurring plumbing issues. Among the most common are:
- Leaky Faucets: A dripping faucet might seem harmless, but it can indicate wear-and-tear or internal damage. Over time, even a minor leak can waste significant amounts of water.
- Clogged Drains: Hair, grease, and soap can accumulate in your home’s plumbing, leading to frustrating backups—especially in sinks and showers.
- Running Toilets: This problem often stems from a malfunctioning flapper, causing the toilet to waste water continuously.
- Water Heater Issues: Fluctuating water temperatures or strange noises can signify that your water heater requires maintenance, much like any other household appliance.
How Often Should I Check My Home’s Plumbing?
Regular plumbing maintenance should be part of your home care routine. It’s advisable to conduct a thorough plumbing inspection at least once a year. However, keep an eye out for warning signs, such as water stains, leaks, or unusual noises, that may prompt more frequent checks. Seasonal maintenance, particularly before winter, is also crucial due to the risk of freezing pipes in colder months.
Essential Tools for Basic Plumbing Repairs
Being prepared for minor plumbing issues can save you headaches down the line. Here’s a list of tools that every Warwick homeowner should have on hand:
- Plunger: An essential tool for tackling clogs in toilets and sinks.
- Pipe Wrench: Useful for gripping and turning pipes, particularly during repairs.
- Adjustable Wrench: Ideal for loosening or tightening nuts and bolts.
- Screwdrivers: A set of both flathead and Phillips screwdrivers is necessary for various tasks.
- Tape Measure: To ensure accurate measurements when replacing fixtures.
- Plumbing Snake: A handy tool to have for addressing stubborn clogs that a plunger can’t fix.
Can I DIY All Plumbing Issues?
While many plumbing tasks are manageable for the average homeowner, not every issue should be tackled alone. Small projects, like unblocking a drain or fixing a leaky faucet, are generally within reach. However, plumbing systems can be complicated, and for major issues such as pipe replacements or extensive leaks, it’s wise to call in a professional. Knowing your limits is crucial; if you’re unsure, it’s better to consult an expert than to make the problem worse.
Preventing Recurring Clogs in Your Sink
Preventative measures can dramatically reduce the hassle of recurring sink clogs. Here are some effective strategies:
- Install Drain Screens: Place screens over your sink drains to catch food particles, hair, and other debris before they enter the plumbing system.
- Regular Cleaning: Periodically flush your drains with a mix of baking soda and vinegar. This natural method can help break down grease and other build-up.
- Avoid Pouring Grease: Never pour cooking grease down the drain, as it can solidify and cling to pipes, leading to severe clogs.
- Maintain Garbage Disposal: If you have a garbage disposal, run it regularly and feed it only appropriate food scraps. Avoid hard items, fibrous vegetables, and starchy foods.
With these insights in mind, Warwick residents can embark on a journey of proactive plumbing care that leads to enhanced comfort and reduced stress. Making plumbing maintenance a routine part of your home upkeep ensures a more enjoyable and functional living environment—so roll up your sleeves and get started today! A few simple actions can go a long way in preserving your home’s plumbing systems, keeping everything flowing smoothly for years to come.
Embrace a Proactive Plumbing Mindset
Now that you’ve taken the first steps in maintaining your crucial water heater, it’s time to expand your plumbing maintenance journey even further. By adopting a proactive approach and incorporating these practical DIY plumbing tips, residents of Warwick, DE, can ensure their plumbing systems remain efficient and foster a comfortable home environment. Regular upkeep not only preserves the functionality of your plumbing but also creates a seamless living experience where everything runs smoothly. Imagine a home where leaks, clogs, and water temperature fluctuations become distant memories. This vision can be your reality by committing to consistent maintenance.
Routine Checks: A Small Investment for Long-Term Benefits
Regular routine checks are key to preventing plumbing-related headaches in your home. Take a moment every few months to perform a checklist of simple maintenance tasks. Consider checking your faucets and showerheads for leaks—small drips can waste significant amounts of water over time. Additionally, ensure that your sinks and tubs are draining properly. A quick inspection can reveal the early signs of a clog, enabling you to take action before things escalate.
Know Your Valves
Another essential aspect of maintaining an efficient plumbing system is understanding your home’s shut-off valves. Familiarize yourself with the main water shut-off valve, as well as individual valves for sinks, toilets, and appliances. Knowing how to quickly turn off the water in case of an emergency provides peace of mind. Periodically test the valves to ensure they’re in working condition, as they may corrode or become stuck over time.
Maintain Your Pipes
Keeping your pipes in good shape is essential for a healthy plumbing system. Inspect your pipes for signs of wear and tear, such as discoloration, cracks, or leaks. In Warwick’s weather, temperature fluctuations can lead to issues like freezing or burst pipes. Insulating exposed pipes can help prevent these problems during the colder months, providing an extra layer of protection and maintaining the efficiency of your plumbing system.
Simple Drain Maintenance
Don’t forget about your drains! They are the unsung heroes of your plumbing system but require regular attention to function correctly. To maintain clear drains, consider using a drain strainer to catch hair and debris. Periodically flush your drains with hot water mixed with vinegar or baking soda to help dissolve buildup. This simple step can easily prevent clogs and keep water flowing freely through your home.
Embrace an Ongoing Maintenance Routine
Incorporating these simple tasks into your household routine will build good habits that lead to long-term benefits. Remember to keep a log or checklist of what tasks you’ve completed and when, providing clarity on your maintenance schedule. As you continue this proactive approach, not only will you maintain your plumbing systems effectively, but you’ll also contribute to your home’s overall comfort and efficiency.
By beginning your plumbing maintenance journey today, you’re not just fixing potential issues—you’re actively investing in your home’s tranquility. A safe, comfortable living space is achievable with careful attention to your plumbing. Share your experiences with neighbors, and foster a community of proactive homeowners in Warwick, DE, united in their quest for home efficiency. Your home deserves it, and so do you.